> For the complete documentation index, see [llms.txt](https://releaseowl.gitbook.io/releaseowl-docs/llms.txt). Markdown versions of documentation pages are available by appending `.md` to page URLs; this page is available as [Markdown](https://releaseowl.gitbook.io/releaseowl-docs/releaseowl-user-guide/sap-analytics-cloud/analytics-cloud-management.md).

# Analytics Cloud Management

This section describes the process of configuring and managing **SAP Analytics Cloud (SAC)** environments in **ReleaseOwl**.

### **Adding SAC Environments to the Project** <a href="#pdf-page-gxe94pcl07aymb35lkd4-adding-sac-environments-to-the-project" id="pdf-page-gxe94pcl07aymb35lkd4-adding-sac-environments-to-the-project"></a>

The SAC environments must be registered in **Project Settings** in ReleaseOwl.

1. **To register SAC environment:**

   * Go to the **Projects** drop-down at the top right corner and click **Project Settings**.
   * In **Project Settings**, navigate to **Environment**.
   * The following screen is displayed.

   <figure><img src="https://1890383800-files.gitbook.io/~/files/v0/b/gitbook-x-prod.appspot.com/o/spaces%2FDWyxe6hm5vqosFaByVgs%2Fuploads%2FzCNPvuqPazGS5C9qx99D%2Fimage.png?alt=media&amp;token=cb48f663-aa32-4eae-8352-4b3b0705910d" alt=""><figcaption></figcaption></figure>

   <figure><img src="https://open.gitbook.com/~gitbook/image?url=https%3A%2F%2F1890383800-files.gitbook.io%2F%7E%2Ffiles%2Fv0%2Fb%2Fgitbook-x-prod.appspot.com%2Fo%2Fspaces%252FDWyxe6hm5vqosFaByVgs%252Fuploads%252F8kmqQm963h5jWidjxkFl%252Fimage.png%3Falt%3Dmedia%26token%3D1e8202b1-d3e7-4cf5-80cb-86549577aae9&#x26;width=768&#x26;dpr=4&#x26;quality=100&#x26;sign=b2dd4bc3&#x26;sv=2" alt=""><figcaption></figcaption></figure>
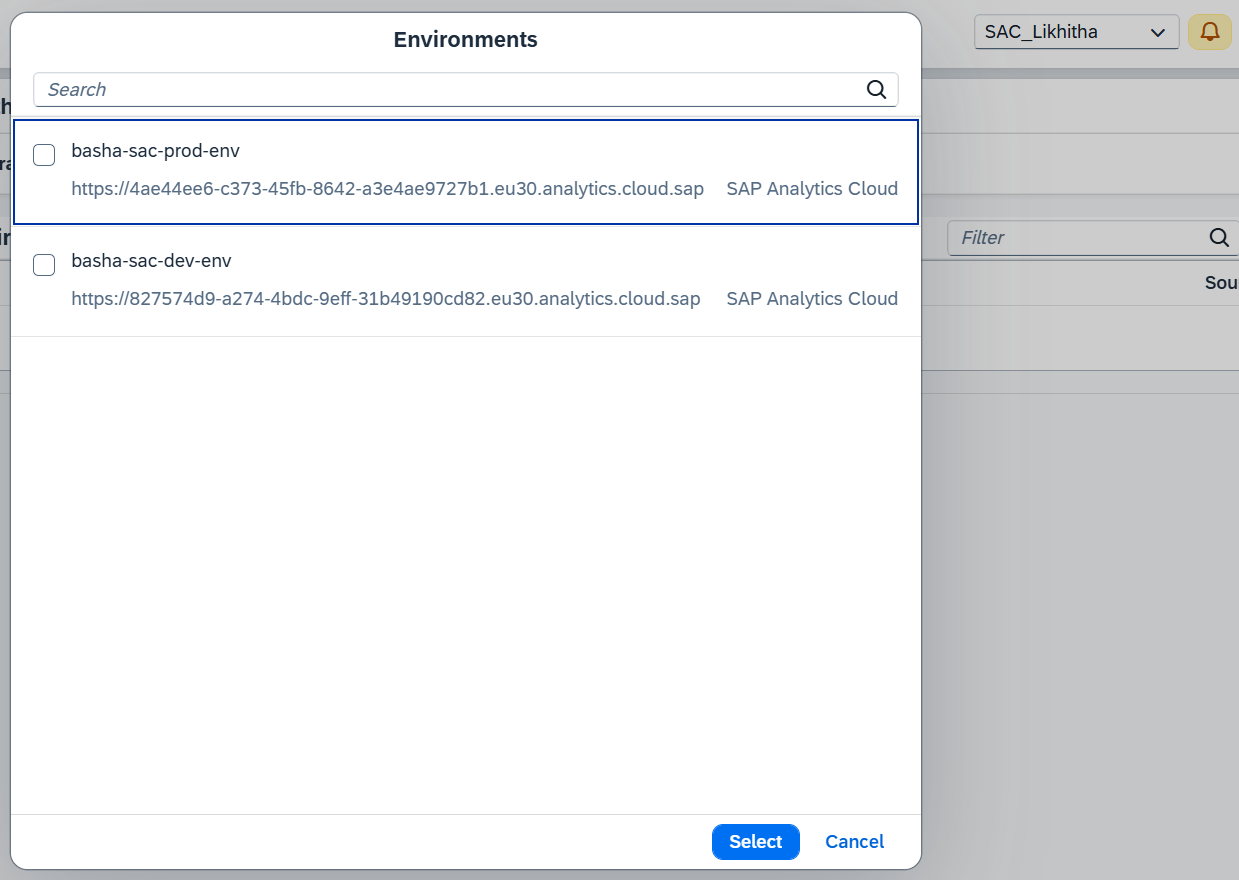
2. Click **Add** to add a new environment in ReleaseOwl.

   * In the subsequent screen, select the required environments from the list displayed.
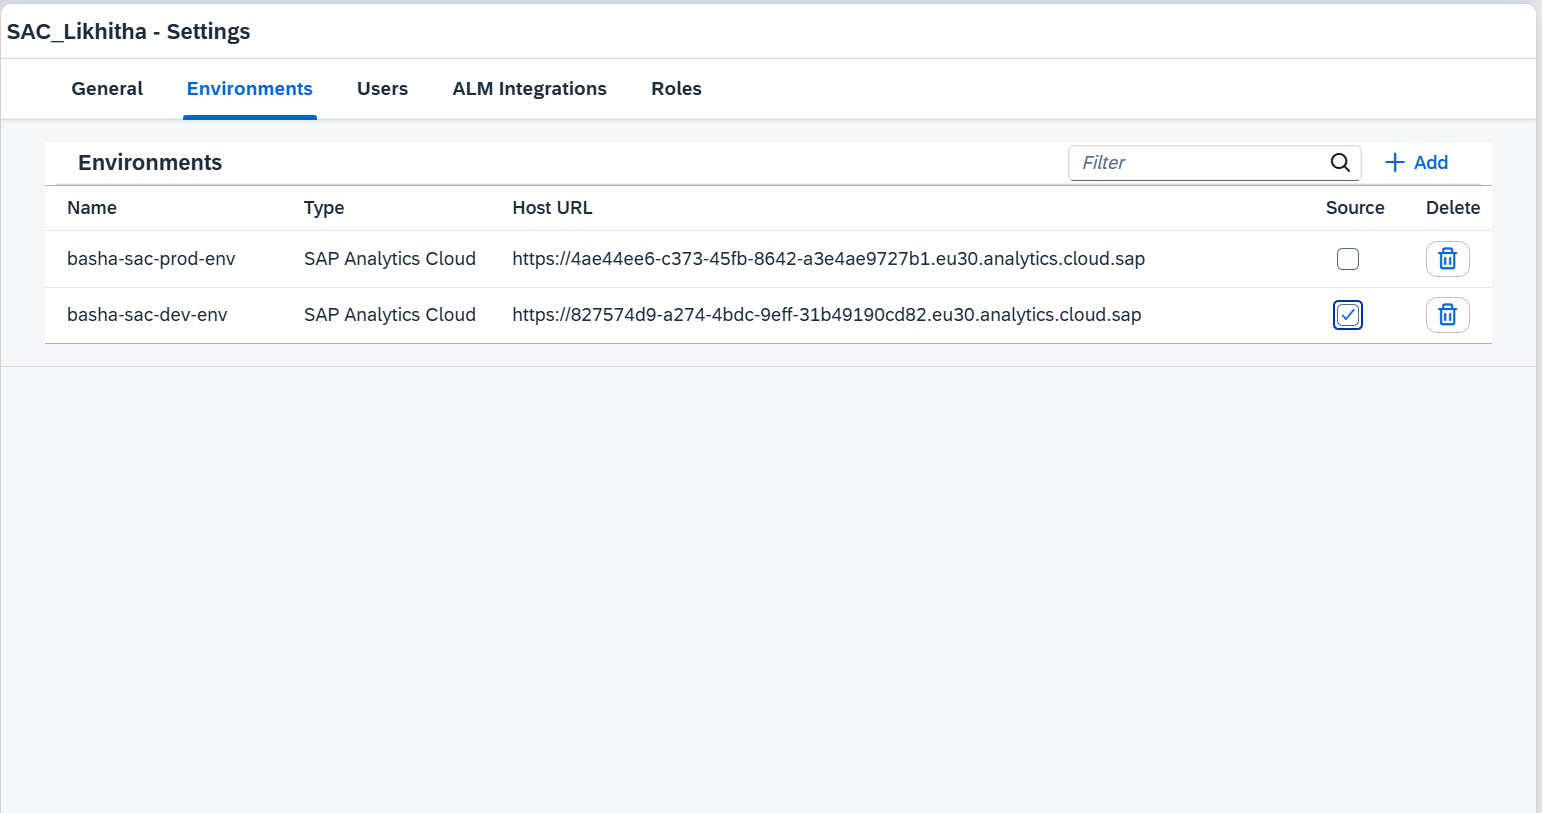
   * Select **Source environment** and **Save** the changes.

   <figure><img src="https://1890383800-files.gitbook.io/~/files/v0/b/gitbook-x-prod.appspot.com/o/spaces%2FDWyxe6hm5vqosFaByVgs%2Fuploads%2FZsyiBVl9nPkNbjtr5es5%2Fimage.png?alt=media&amp;token=4656e733-c0ff-473e-81c2-43fc53e49411" alt=""><figcaption></figcaption></figure>

{% hint style="info" %}
**Note:** Only the artifacts from the source are synced to ReleaseOwl.
{% endhint %}

3. The environment gets added to the corresponding project in ReleaseOwl.

<figure><img src="https://1890383800-files.gitbook.io/~/files/v0/b/gitbook-x-prod.appspot.com/o/spaces%2FDWyxe6hm5vqosFaByVgs%2Fuploads%2FP3UftbBiW3TqjR0NtYNt%2Fimage.png?alt=media&amp;token=cf83804f-f879-4533-b7da-62fc4676b497" alt=""><figcaption></figcaption></figure>

4. Click on the **Users** tab. This tab lists all existing users associated with the project.4
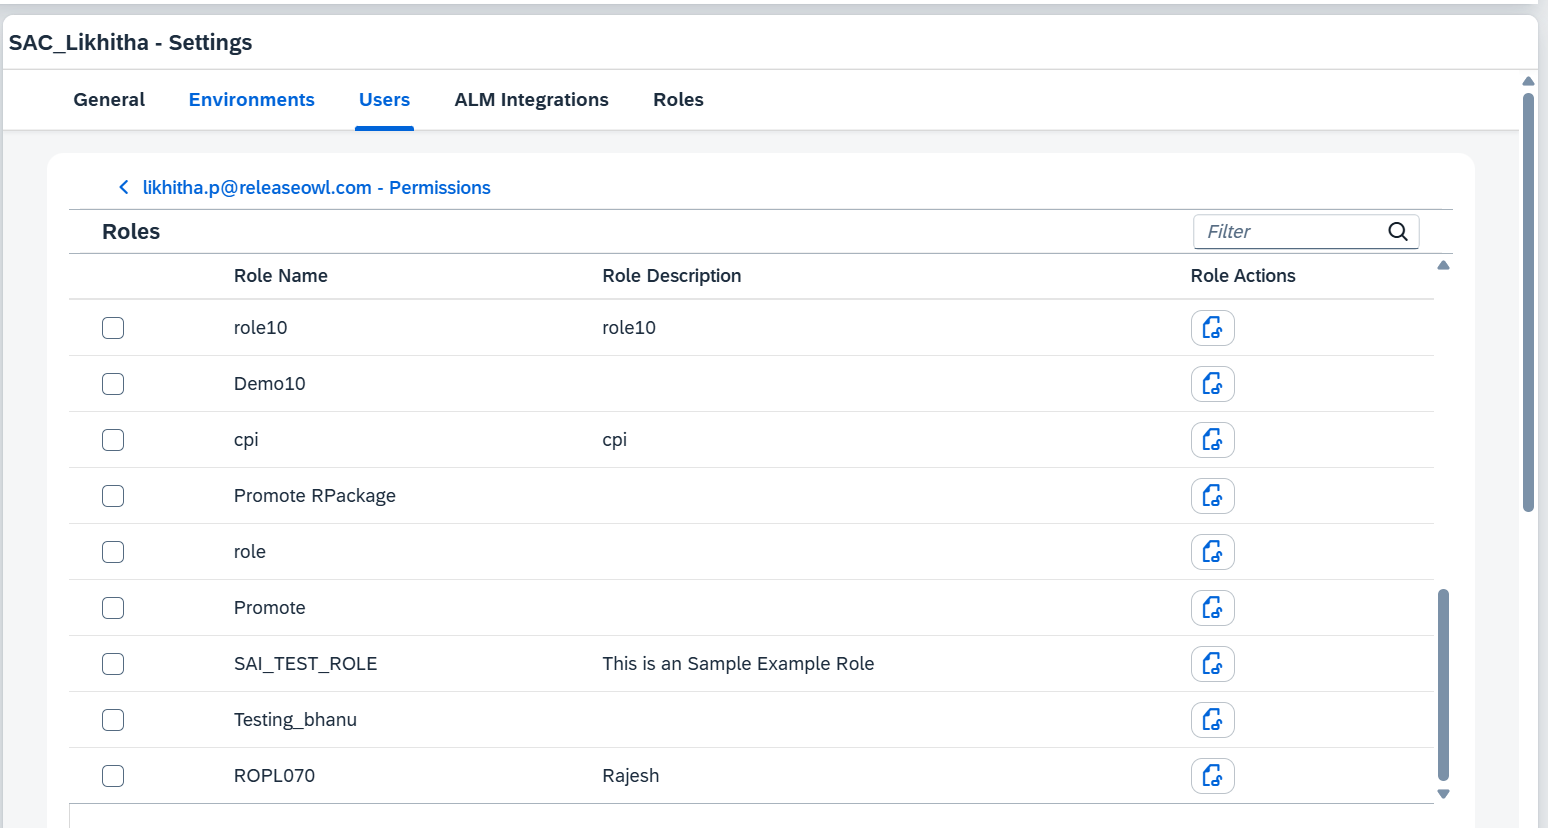
5. Click on the **edit (lock)** icon next to the user for whom you want to manage roles and permissions.

<figure><img src="https://1890383800-files.gitbook.io/~/files/v0/b/gitbook-x-prod.appspot.com/o/spaces%2FDWyxe6hm5vqosFaByVgs%2Fuploads%2F4AbhNUCvQeMxLeEzsVb3%2Fimage.png?alt=media&amp;token=6bbf9675-e48e-45d6-ab22-24dcadae43a7" alt=""><figcaption></figcaption></figure>

6. This will open the **Permissions** page for the selected user.

<figure><img src="https://1890383800-files.gitbook.io/~/files/v0/b/gitbook-x-prod.appspot.com/o/spaces%2FDWyxe6hm5vqosFaByVgs%2Fuploads%2FxUqrj9P3fpyn4sSrDiGx%2Fimage.png?alt=media&amp;token=78076603-ad50-477f-8d86-beee4a6e218c" alt=""><figcaption></figcaption></figure>

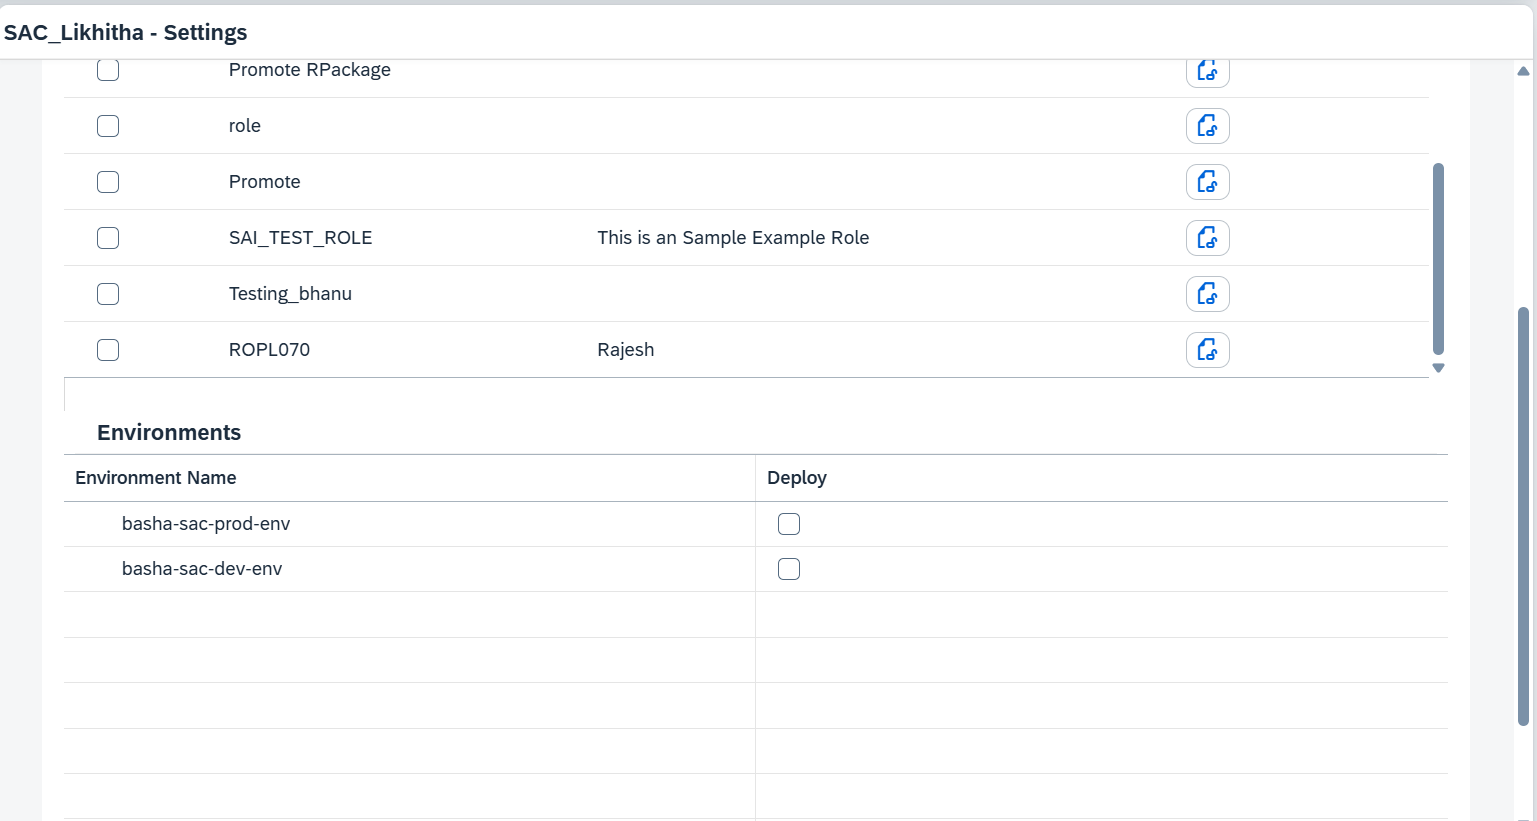
7. Scroll down to the Environments section.
8. Check the Deploy checkbox for the relevant environment(s) to enable deploy access.

<figure><img src="https://1890383800-files.gitbook.io/~/files/v0/b/gitbook-x-prod.appspot.com/o/spaces%2FDWyxe6hm5vqosFaByVgs%2Fuploads%2FXWVEFO6qBBhFnqXUvxbl%2Fimage.png?alt=media&amp;token=db17f74e-2355-4ca3-91b7-cd66ead300bc" alt=""><figcaption></figcaption></figure>

### **SAC Management and Deployment**

1. **Sync Packages:**

   * Go to **SAC Management** in the **Build** section and click on **Sync Packages**.

   <figure><img src="https://1890383800-files.gitbook.io/~/files/v0/b/gitbook-x-prod.appspot.com/o/spaces%2FDWyxe6hm5vqosFaByVgs%2Fuploads%2F2XMQuabUtnJQmF1wOcMA%2Fimage.png?alt=media&amp;token=53e9ce02-552e-4c4b-b26e-e3ae9465ed70" alt=""><figcaption></figcaption></figure>

* You can see the **Deployment History** by clicking on the **Actions** button and selecting **Deployment History**.

<figure><img src="https://1890383800-files.gitbook.io/~/files/v0/b/gitbook-x-prod.appspot.com/o/spaces%2FDWyxe6hm5vqosFaByVgs%2Fuploads%2FQcaLD2oIyuMKSUBfWQAb%2Fimage.png?alt=media&amp;token=a416349b-ff40-41c2-8afc-0588954a3e88" alt=""><figcaption></figcaption></figure>

2. **View Package Details:**

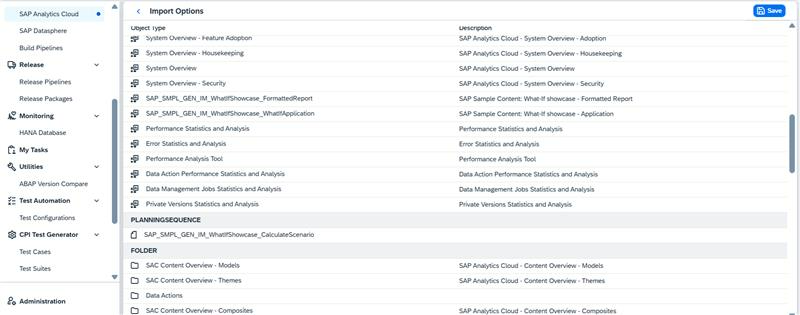
* Click the **Actions** button and select **Import Settings** to view package details.

<figure><img src="https://1890383800-files.gitbook.io/~/files/v0/b/gitbook-x-prod.appspot.com/o/spaces%2FDWyxe6hm5vqosFaByVgs%2Fuploads%2FPYzgszj8iWcdroVLTBpf%2Fimage.png?alt=media&amp;token=ca899c15-3b11-4ca6-ad97-e934fb5c4b6c" alt=""><figcaption></figcaption></figure>

* Each package has different import settings, and you need to configure the import settings for the required package.

<figure><img src="https://1890383800-files.gitbook.io/~/files/v0/b/gitbook-x-prod.appspot.com/o/spaces%2FDWyxe6hm5vqosFaByVgs%2Fuploads%2FXLGBwxKuUEVouUTsns4k%2Fimage.png?alt=media&amp;token=67ff23e6-3e17-4625-8b8d-3e4c804158bb" alt=""><figcaption></figcaption></figure>

3. **Release  Pipelines:**

* Go to the Release Pipelines and click on the **Create New Release Pipeline.**

<figure><img src="https://1890383800-files.gitbook.io/~/files/v0/b/gitbook-x-prod.appspot.com/o/spaces%2FDWyxe6hm5vqosFaByVgs%2Fuploads%2FkSnDwEwJoSJqmuvGF11h%2Fimage.png?alt=media&amp;token=254fd1db-aa4d-4378-bce5-80e9c85a0acd" alt=""><figcaption></figcaption></figure>

* Enter a  **Release** **Pipeline Name**.

<figure><img src="https://1890383800-files.gitbook.io/~/files/v0/b/gitbook-x-prod.appspot.com/o/spaces%2FDWyxe6hm5vqosFaByVgs%2Fuploads%2FH4e0Bzc3dMBzsSkrnrSl%2Fimage.png?alt=media&amp;token=332e0bcf-d984-4176-af8b-040d74dba946" alt=""><figcaption></figcaption></figure>

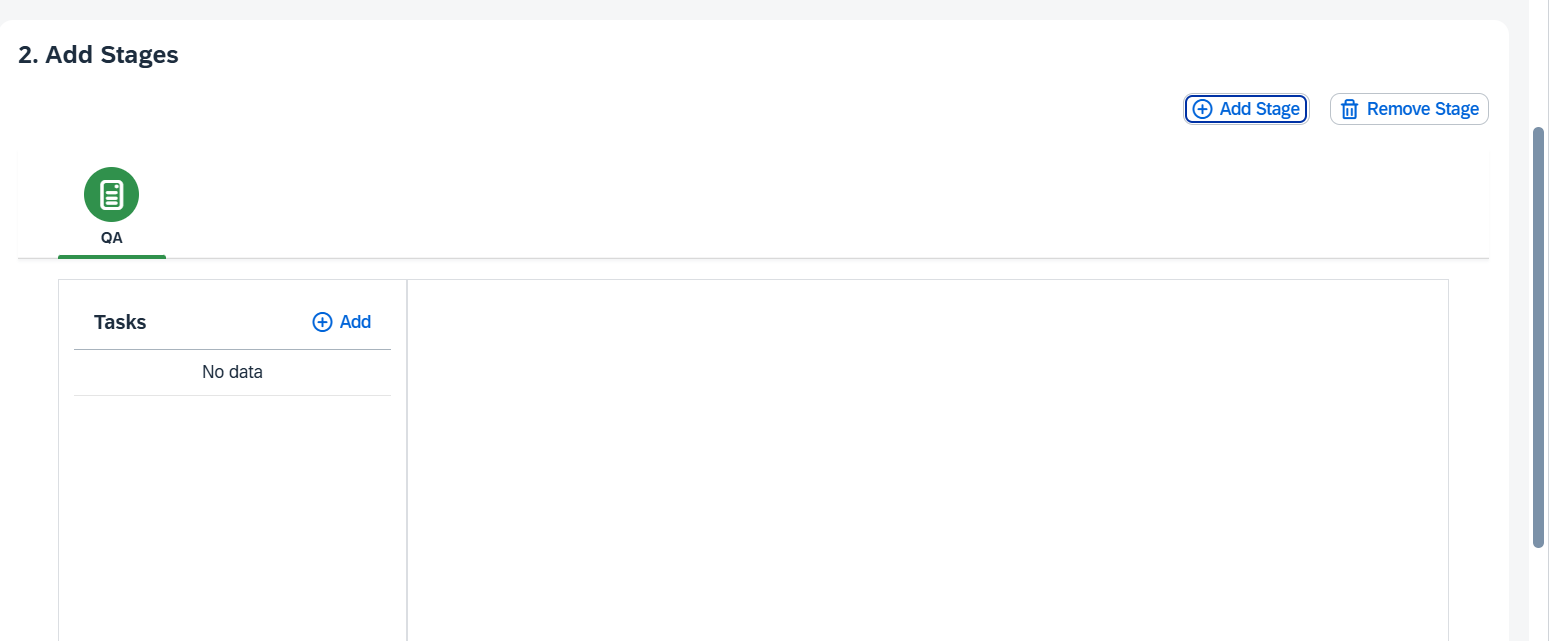
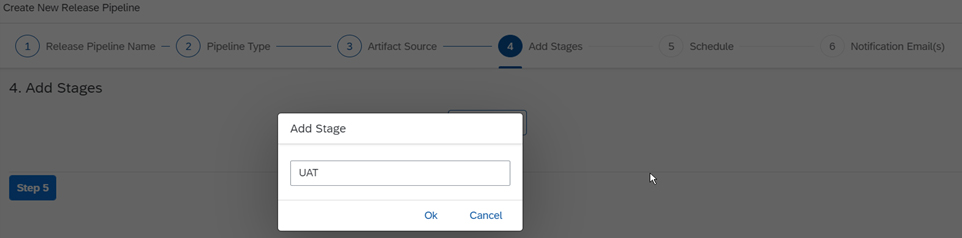
* Click **Add Stage**.

<figure><img src="https://1890383800-files.gitbook.io/~/files/v0/b/gitbook-x-prod.appspot.com/o/spaces%2FDWyxe6hm5vqosFaByVgs%2Fuploads%2F43XhnuNWkHuq90mJVFNI%2Fimage.png?alt=media&amp;token=24b7a8bc-bc5d-4a99-b6d0-796b6c24dbae" alt=""><figcaption></figcaption></figure>

* Enter the stage name say for e.g., UAT or QA where the deployment has to be carried out and click OK.

<figure><img src="https://1890383800-files.gitbook.io/~/files/v0/b/gitbook-x-prod.appspot.com/o/spaces%2FDWyxe6hm5vqosFaByVgs%2Fuploads%2FIAG9q4iMCKFiUqJcVz0P%2Fimage.png?alt=media&amp;token=617e6ef7-dd02-4385-bf87-c4b8f7ce925f" alt=""><figcaption></figcaption></figure>

* **Tasks:** Click **Add** to enter any tasks that are to be performed

<figure><img src="https://1890383800-files.gitbook.io/~/files/v0/b/gitbook-x-prod.appspot.com/o/spaces%2FDWyxe6hm5vqosFaByVgs%2Fuploads%2FuIhxtE6lqwSYnupD8TGv%2Fimage.png?alt=media&amp;token=1b0cf350-a35d-49c4-abad-e1ec97ac9ac7" alt=""><figcaption></figcaption></figure>

{% hint style="info" %}
**Note:** To remove any stage, click Remove stage button.
{% endhint %}

* Different tasks that can be added are as follows:

<figure><img src="https://1890383800-files.gitbook.io/~/files/v0/b/gitbook-x-prod.appspot.com/o/spaces%2FDWyxe6hm5vqosFaByVgs%2Fuploads%2FH9LidZKgB1rSZwR82KwN%2Fimage.png?alt=media&amp;token=3740d758-e0d0-439d-9540-5943ca8ff4f9" alt=""><figcaption></figcaption></figure>

**Add a Deployment Stage**

* Click on **Add** under the **Tasks** section.
* Select **SAC - Deployment** from the available task types.

**Configure Task Details**

In the **Task Details** panel on the right side, fill in the following information:

| **Field**                  | **Description**                                              |
| -------------------------- | ------------------------------------------------------------ |
| **Name**                   | Enter a unique name for your task.                           |
| **Description**            | Optionally, provide a brief description of the task.         |
| **Select SAC Environment** | Choose the SAC environment for deployment from the dropdown. |

**Optional Settings**

You may optionally configure the following:

* **Schedule Time**\
  Enable this checkbox to schedule the deployment at a specific date and time.
* **Notify Users**\
  Enable this checkbox to send email notifications to selected users after task execution.
* **Notify Promotion User**\
  Enable this checkbox to notify the user who promoted the pipeline.

**Finalize the Task**

* Once all configurations are complete, click **Next** to proceed to **Step 3: Notification Email(s)** or continue adding more tasks as needed.

<figure><img src="https://1890383800-files.gitbook.io/~/files/v0/b/gitbook-x-prod.appspot.com/o/spaces%2FDWyxe6hm5vqosFaByVgs%2Fuploads%2FhHfWLSkRy5AfU7wmZVhX%2Fimage.png?alt=media&amp;token=6ebf12e7-8c25-4f1c-bdbf-23ffdf2435f7" alt=""><figcaption></figcaption></figure>