> For the complete documentation index, see [llms.txt](https://releaseowl.gitbook.io/releaseowl-docs/llms.txt). Markdown versions of documentation pages are available by appending `.md` to page URLs; this page is available as [Markdown](https://releaseowl.gitbook.io/releaseowl-docs/releaseowl-user-guide/sap-btp/build-pipelines.md).
# Build Pipelines
A Build Pipeline compiles the application source and produces the MTAR artifact. ReleaseOwl uses two categories of build pipeline for MTAR delivery:
• **Per-environment build pipelines** — configured for each environment branch and assigned in the Landscape Configuration (the Build Pipeline field of each landscape row).
• **Dynamic build pipeline** — assigned on the application (Build Pipeline for Dynamic Branches) and used to build dynamic branches such as hotfix branches and staging branches that are created on demand and have no fixed per-environment pipeline.
* Build Pipelines are created and maintained under Build → Build Pipelines.
### **Build Pipeline (SAP BTP)**
#### **Artifact**
An artifact is a folder or a zip file containing files needed during the deployment of software to an environment.
#### **Build Pipeline**
A pipeline is the sequence of activities executed one at a time in the form of a workflow configured in your Continuous Integration and Delivery (CI/CD) platform. A Build Pipeline is used to generate artifacts from the source code. Build Pipelines can be created and run with ReleaseOwl. It fetches the source from the GIT Repository and packages the application as an MTA artifact.
#### **MTA (Multitarget Application)**
An MTA is logically a single application consisting of multiple related and interdependent parts, called modules. These modules are:
* Developed using different technologies.
* Designed to run on different target runtime environments.
* Managed with a single, consistent lifecycle.
{% hint style="info" %}
**Note:** For more details on SAP BTP App Development, refer to the following link: [**SAP BTP App Development - Multitarget Application**](https://help.sap.com/docs/BTP/65de2977205c403bbc107264b8eccf4b/d04fc0e2ad894545aebfd7126384307c.html?q=Multitarget%20Application)
{% endhint %}
### **MTAR File Generation**
The MTA archive builder is a standalone command-line tool that builds a deployment-ready MTAR (`.mtar`) file from the artifacts of an MTA project according to the project’s MTA development descriptor (`mta.yaml` file).
### **Key Points about MTAR File Generation**
1. The build process and the resulting MTA archive depend on the target platform.
2. The supported platforms currently by ReleaseOwl are:
* **SAP BTP**
* **SAP HANA Extended Application Services (XSA), Advanced Model Environment**
#### **Prerequisites**
1. Create new project of type SAP BTP (MTAR) or SAP HANA XSA (MTAR)
2. Register BTP Credentials and BTP Environment with ReleaseOwl before starting to work with Build Pipelines.
### **Build Pipelines**
The Build section in ReleaseOwl enables developers to create MTAR artifacts and validate changes thoroughly for early feedback.
1. Navigate to the **Build Pipelines** section and click on **New** **Build Pipeline**.
2. The **New Build Pipeline** window is displayed, providing the following options:
* **Create New Build Pipeline** – Create a new pipeline from scratch.
* **Import Build Pipeline** – Import an existing pipeline configuration.
3. Select the desired option.
4. Click **Create** to proceed with the selected action.
5. Enter a unique and meaningful name for the Build Pipeline in the **Build Pipeline Name** field.
6. Click **Step 2** to proceed to the next stage of the pipeline configuration.
**Repository Configuration**
1. **Repository URL**: Enter the repository URL (for example, GitHub, GitLab, or Bitbucket).
2. **SCM Credentials**: Select the required source control credentials from the drop-down list.
3. **Branch**: Select the branch to be used for the build process (for example, **QA**, **Master**, or **Dev**).
4. **Dynamic branch** : Select this checkbox to use a dynamic branch during pipeline execution. When enabled, you do not need to specify a fixed branch in the **Branch** field, as the branch is provided at runtime.
5. **Version Control System**: Select the repository type (for example, **GitHub**, **GitLab**, or **Bitbucket**).
6. After entering the required details, click **Step 3** to continue.
**Builder Section**
1. **Build Type**: Automatically populated based on the selected project configuration.
2. **Build Tool Version**: Select the required build tool version.
3. **Max # of Builds to Keep**: Specify the maximum number of build records to retain. It is recommended to set this value to **30** to preserve recent build history and prevent excessive storage consumption in Jenkins.
4. After completing the configuration, click **Step 4** to proceed.
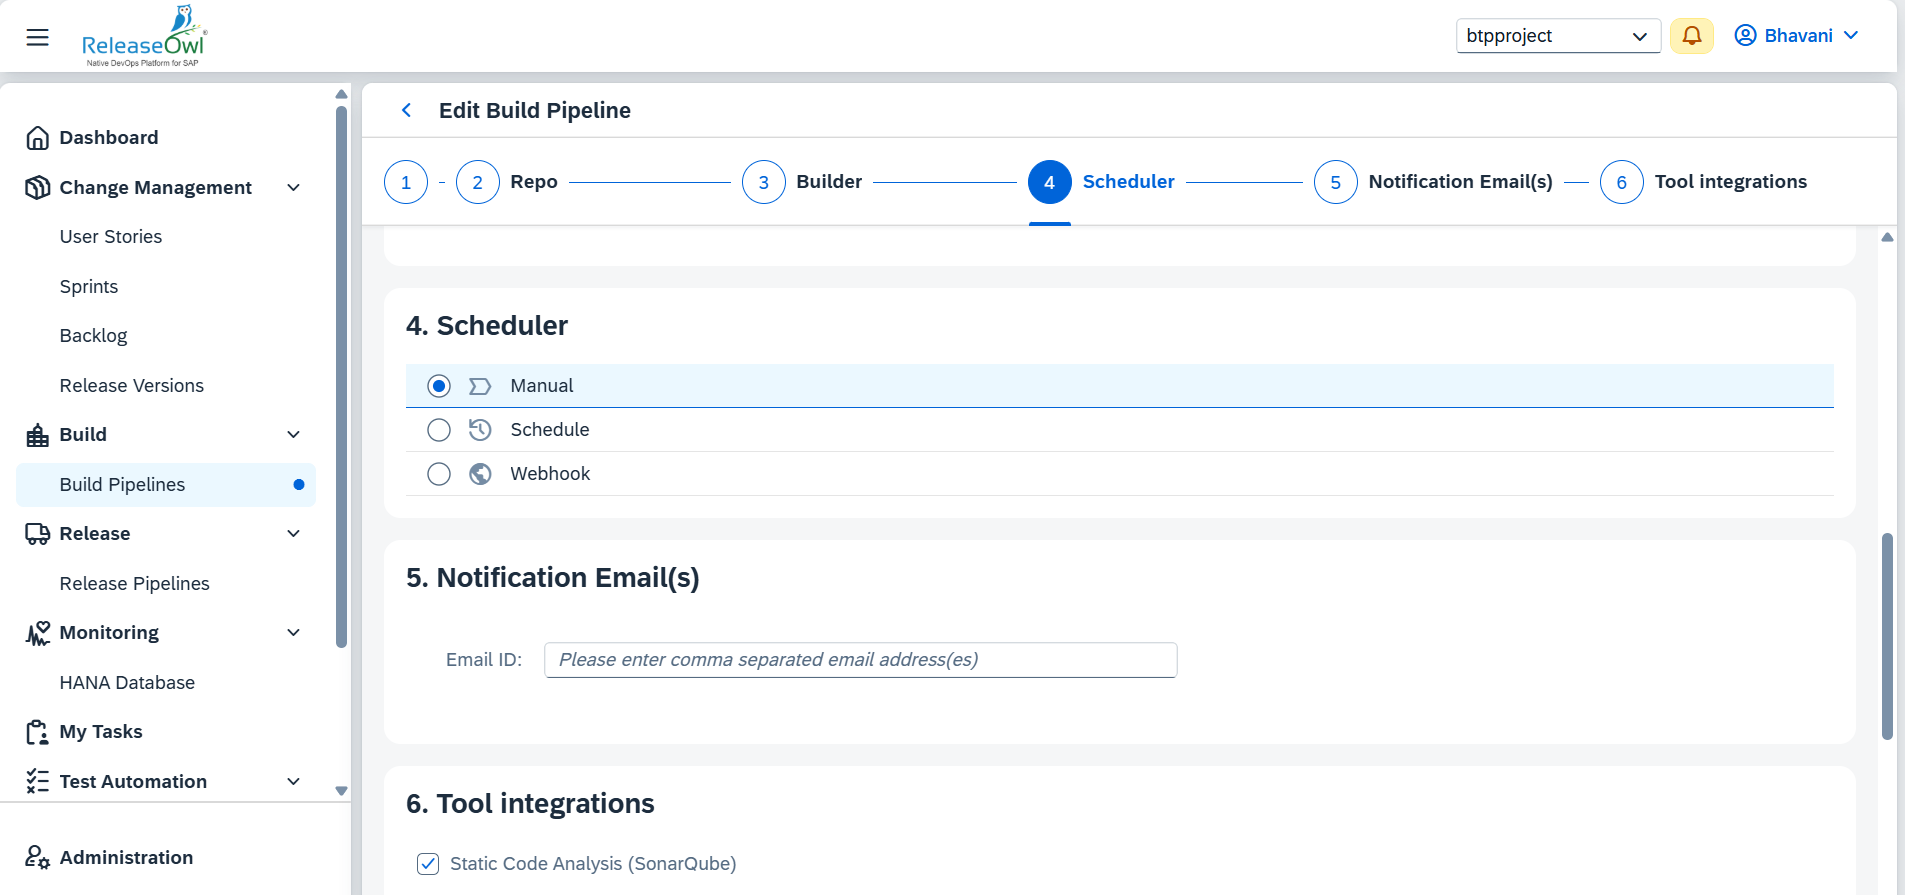
**Scheduler Section**
Configure the pipeline execution and notification settings:
1. **Scheduler**: Select how the Build Pipeline should be triggered:
* **Manual** – The pipeline is executed manually by a user.
* **Schedule** – The pipeline is executed automatically based on a predefined schedule.
* **Webhook** – The pipeline is triggered automatically when events occur in the source code repository, such as code commits or pull requests.
2. After selecting the required scheduler option, click **Step 5** to continue.
**Environment**
Configure the deployment environment for the Build Pipeline:
1. **Development Environment** – Select the required environment from the drop-down list. The available environments are those that have been previously registered in ReleaseOwl through the **SAP Cloud Environment** registration process.
2. After selecting the required development environment, click **Step 6** to continue.
**Notification**
1. **Notification Emails**: Enter one or more email addresses to receive build status notifications, including build success, failure, and other pipeline-related updates.
2. After entering the required notification email addresses, click **Step 7** to continue
### **Tool Integrations**
The **Tool Integrations** step allows you to configure additional validation and security tools that run during the Build Pipeline execution. You can enable one or more integrations based on your project requirements.
#### **1. Static Code Analysis**
Use **Static Code Analysis** tools, such as SonarQube, to perform code quality analysis during the build process.
To configure Static Code Analysis:
1. Select the **Static Code Analysis** checkbox.
2. From the **Credentials** drop-down list, select the appropriate SonarQube credential.
The available credentials are those previously configured in the **Credentials** section of ReleaseOwl.
3. The available credentials are those previously configured in the **Credentials** section of ReleaseOwl.
**ESLint**
ESLint is a static analysis tool that analyzes source code without executing it to identify coding standard violations, syntax errors, and potential issues.
When enabled, ReleaseOwl executes the ESLint script configured in your project repository during the Build Pipeline execution and forwards the analysis results to SonarQube. The reported violations are also available in the **Issues** tab within ReleaseOwl.
**Prerequisites**
Before enabling ESLint, ensure that your project repository contains the following:
* An **ESLint configuration file** (such as `eslint.config.js` or `.eslintrc.json`) must be present in the repository. This file contains the linting rules that ESLint uses to detect issues in the source code.
* The `package.json` file must contain the following lint script to execute ESLint and generate the `eslint-report.json` file required for SonarQube integration:
```
"lint:sonar": "eslint . -f json -o eslint-report.json"
```
* This script runs ESLint on the project and generates an `eslint-report.json` file, which is imported by SonarQube to display ESLint issues.
* ESLint dependencies declared in the project's `package.json`.
**Configure ESLint in ReleaseOwl**
To enable ESLint in the Build Pipeline:
1. Navigate to the **Tool Integrations** step while creating or editing the Build Pipeline.
2. Select the **ESLint** checkbox.
3. Ensure that **Static Code Analysis** is enabled and a valid **SonarQube** credential is selected.
#### **2. Malware Scan**
Configure malware scanning to detect potential security threats in the application artifacts.
* Ensure that the **Malware Scan** option is available in the **Tool Integrations** stage.
* Select the **Malware Scan** checkbox to enable malware scanning.
* **Credentials**: Select the registered credential from the drop-down list.
* **Timeout**: Specify the timeout duration for the malware scan process.
{% hint style="info" %}
**Note:** For instructions on creating a Malware Scan credential, refer to the [**Malware Scan Credential** ](https://releaseowl.gitbook.io/releaseowl-docs/releaseowl-admin-guide/general-administration/credential-management/malware-scanning)page.
{% endhint %}
#### **3. SAP CVE Scan**
CVE scans identify any vulnerable versions of libraries used in your **CAP application** by checking known vulnerabilities.
* Enable the option for **SAP CVE Scan**.
**Configure CVE Settings**
1. In the **Project Settings**, go to the **CVE** section.
2. Enter the necessary details:
* **CVE ID**: Enter the CVE ID (e.g., CVE-2023-50422) associated with the vulnerability.
* **Library Name**: Specify the name of the affected library.
* **Versions**: Provide the version(s) of the library that are vulnerable.
3. Click **Save** to ensure the scan is correctly set up.
#### **4. Karma**
Karma is a test runner that executes OPA5 test cases during the Build Pipeline execution. ReleaseOwl invokes the configured Karma script from your repository and displays the test execution results as part of the build. ReleaseOwl does not create or maintain OPA5 test cases.
#### Prerequisites
Before enabling Karma in a Build Pipeline, ensure that your repository contains the following:
* A **karma.conf.js** file that defines the browser, required frameworks (such as UI5 and QUnit), reporters, and other Karma settings.
* The required Karma dependencies configured in the **package.json** file.
* A script entry in **package.json** that executes the Karma configuration. This script name is used while configuring the Build Pipeline.
* A **sonar-project.properties** file, if SonarQube analysis is enabled. The **sonar-project.properties** file must include the following properties to identify the test files:
{% code overflow="wrap" %}
```
sonar.tests=webapp/test
sonar.test.inclusions=webapp/test/unit/**/*.js,webapp/test/integration/**/*.js
```
{% endcode %}
**Configure Karma in ReleaseOwl**
To enable Karma in the Build Pipeline:
1. Navigate to the **Tool Integrations** step while creating or editing the Build Pipeline.
2. Select the **Karma** checkbox.
3. In the **Karma Scripts** field, enter the script name defined in the **package.json** file.
4. Ensure that **Static Code Analysis** is enabled and a valid **SonarQube** credential is selected.
**Actions Button**
After clicking **Save**, the new Build Pipeline is created and appears in the Build Pipelines list.
The **Actions** menu provides the following options:
1. **Edit :** Use **Edit** to modify the existing build pipeline configuration. This option allows you to update details such as the repository, branch, build type, schedules, or any pipeline-related settings. Any changes made are applied to the existing Build Pipeline.
2. **Commits :** Use **Commits** to view the list of source code commits associated with the Build Pipeline. This helps track the changes included in each build execution.
3. **Save as:** Use **Save As** to create a copy of an existing Build Pipeline. The copied pipeline can then be modified independently without affecting the original pipeline.
4. **Archive :**Use **Archive** to move a Build Pipeline from the active list to the archived list. Archived pipelines are retained in the system for reference and can be restored when required. While archived, the pipeline is not available for regular use.
5. **Export Build Pipeline:** Use **Export Build Pipeline** to export the configuration of a Build Pipeline. The exported file can be imported while creating a new Build Pipeline using the **Import Build Pipeline** option, enabling the same configuration to be reused across different projects or environments.
**Run the Build Pipeline**
1. Click on the **Build Now** button to run the pipeline.
2. After the Build Pipeline execution is complete, click the **arrow (>)** next to the pipeline to view the execution results.
3. The **Build** tab displays the execution status of each stage in the pipeline along with detailed logs.
The following information is available:
* **Stage:** Displays the name of each pipeline stage. The available stages and actions may vary depending on the Build Pipeline configuration and the tools enabled in the **Tool Integrations** stage.
* **ESLint:** If **ESLint** is enabled in the **Tool Integrations** stage, the **ESLint** stage is displayed in the Build results. If the ESLint analysis completes successfully, the stage status is displayed as **Success**. Click the **{}** icon in the **Logs** column to view the detailed ESLint execution logs.
* If **SonarQube** is enabled, click **SonarQube Report** to view the test metrics and code quality results, including:
* **ESLint** - Click the **ESLint** hyperlink to navigate to the **Issues** tab in the **SonarQube Report**, which lists the ESLint rule violations.
* **OPA5 Tests:** If **Karma** is enabled in the **Tool Integrations** stage, the **OPA5 Tests** stage is displayed in the Build results. When the OPA5 test execution completes successfully, the stage status is displayed as **Success**. If one or more OPA5 test cases fail, the stage status is displayed as **Unstable**. Click the **{}** icon to view the detailed OPA5 test execution logs.
* If **SonarQube** is enabled, click **SonarQube Report** to view the test metrics and code quality results, including:
* **OPA5 Tests** – Displays the total number of OPA5 test cases executed through Karma and included in the SonarQube analysis.
* **Status:** Indicates the execution result of each stage.
* **Timestamp:** Shows the date and time when the stage was executed.
* **Duration:** Displays the total time taken to complete the stage.
* **Logs:** Click the **{}** icon to view the detailed execution logs for the selected stage.
{% hint style="info" %}
**Note:** You can now access build log information even after the logs have expired. This allows you to review past build activities for better tracking and understanding of your deployment history.
{% endhint %}