# Global Credential Management
There are several third-party sites and applications that can interact with **ReleaseOwl**, like artifact repositories, cloud-based storage systems, services etc. The admin can configure credentials in the application for use by Release Owl. Once the user adds/configures the credentials in Release Owl, the credentials can be used by Pipeline projects to interact with the 3rd party applications.
## **Registering the Credential Manager**
Admin users can switch to the **Administration View** to access the **Credential Manager**.
1. Click the **Credential Manager** option from the left-hand menu to view the list of registered credentials.
2. In the **Credential Type** section, you can see:
* **Credential Types** –Select from the available types to view the corresponding registered credentials. You can also select multiple credentials to view them together.
* **Scope** – Credentials are categorized based on visibility:
* **Global**: Visible to all users. Credentials created under this scope cannot be deleted by other users.
* **Private**: Visible only to the user who created them. These credentials remain hidden from other users.
* **Search Bar** – Use this to quickly search for credentials by name.
3. **Registering a New Credential**:
* To add a new credential, click **Register Credential**, available on the right-hand panel.
* The following screen will be displayed:
## **Credential Types**
ReleaseOwl supports various credential types for registration. Below, we will explore each type in detail.
### **Version Control**
1. Click on the **"Register Credential"** button.
2. Fill in the required fields:
* **Credential Name**: Enter a name of your choice.
* **Credential Type**: Select **Version Control**.
* **Scope** – Select the scope of the credential:
* **Global** – Visible to all users.
* **Private** – Visible only to the user who created it.
* **Username**: Enter your GitHub/Bitbucket username.
* **Password**: Enter your GitHub/Bitbucket password.
3. Save the configuration to enable access to your GitHub/Bitbucket account.
{% hint style="info" %}
For information on setting up the tokens in GITHub, please refer to the link -
{% endhint %}
{% hint style="info" %}
For information on setting up the tokens in BitBucket, please refer to the link -
{% endhint %}
### **Azure DevOps**
1. Click on the **"Register Credential"** button.
2. Fill in the required fields:
* **Credential Name**: Enter a name of your choice.
* **Credential Type**: Select **Azure DevOps**.
* **Scope** – Select the scope of the credential:
* **Global** – Visible to all users.
* **Private** – Visible only to the user who created it.
* **Username**: Enter your Azure DevOps username.
* **Token**: Provide your Azure DevOps personal access token (PAT).
* **Host URL**: Enter the Azure DevOps organization URL (e.g., `https://dev.azure.com/)`.
3. Save the configuration to enable access to your Azure DevOps account.
{% hint style="info" %}
For information on setting up the tokens in Azure DevOps, please refer to the link -
{% endhint %}
### **SAP Cloud Environment**
#### Credential Registration for SAP Cloud Environment.
1. Click on the **"Register Credential"** button.
2. Fill in the required fields:
* **Credential Name**: Enter a name of your choice.
* **Credential Type**: Select **SAP Cloud Environment**.
* **Scope** – Select the scope of the credential:
* **Global** – Visible to all users.
* **Private** – Visible only to the user who created it.
* **Authentication Type**: Choose either **Basic** or **OAuth2**.
* If **Basic** is selected:
* Provide your **Username** and **Password** (SAP BTP credentials).
* If **OAuth2** is selected:
* **Client ID**: Provide the details from the created API service key in the SAP BTP cockpit.
* **Client Secret**: Provide the details from the created API service key in the SAP BTP cockpit.
* **Token URL**: Provide the details from the created API service key in the SAP BTP cockpit.
3. Click **Save**.
4. The credential will appear in the List of Credentials.
{% hint style="info" %}
OAuth 2 provides better security than basic authentication as the initial requests for credentials are made under the SSL protocol and its access object is a transitory token.
For more detailed guidance on creating service instances and service keys, please refer to the following resource: [Creating Service Instance and Service Key for Inbound Authentication | SAP Help Portal](https://help.sap.com/docs/cloud-integration/sap-cloud-integration/creating-service-instance-and-service-key-for-inbound-authentication)
{% endhint %}
### **SAP HANA XSA Environment**
1. Click on the **"Register Credential"** button.
2. Fill in the required fields:
* **Credential Name**: Enter a name of your choice.
* **Credential Type**: Select **SAP HANA XSA Environment**.
* **Scope** – Select the scope of the credential:
* **Global** – Visible to all users.
* **Private** – Visible only to the user who created it.
* **Username**: Enter your **SAP BTP** username.
* **Password**: Enter your **SAP BTP** password.
3. Click **Save**.
4. The credential will appear in the **List of Credentials**.
### **SonarQube On-Prem**
1. Click on the **"Register Credential"** button.
2. Fill in the required fields:
* **Credential Name**: Enter a name of your choice.
* **Credential Type**: Select **Static Code Analysis -SonarQube** .
* **Scope** – Select the scope of the credential:
* **Global** – Visible to all users.
* **Private** – Visible only to the user who created it.
* **Username**: Enter your SonarQube username.
* **Token**: Provide your SonarQube authentication token.
* **Host URL**: Enter the URL of your SonarQube instance (either On-Premise or Cloud).
* **Hosting Type**: Choose either **On-Premise** or **Cloud**, depending on your SonarQube setup.
3. Save the changes to configure and enable access to your SonarQube On-Prem account.
{% hint style="info" %}
Further information on getting the user token for SonarQube can be found @
{% endhint %}
### **Transport Manager Credential**
1. Click on the **"Register Credential"** button**.**
2. **Fill in the required fields:**
* **Credential Type**: Select **Transport Manager Credential** from the dropdown.
* **Scope** – Select the scope of the credential:
* **Global** – Visible to all users.
* **Private** – Visible only to the user who created it.
* **Credential Name**: Provide any name of your choice.
* **Username**: Enter your username for the Transport Domain Controller system.
* **Password**: Provide the password associated with your username.
3. Click **Save** to finalize the setup and enable access to your Transport Domain Controller system.
### **JIRA**
1. Click on the **"Register Credential"** button**.**
2. Fill in the required fields:
* **Credential Name**: Enter a name of your choice .
* **Credential Type**: Select **Jira** from the dropdown.
* **Scope** – Select the scope of the credential:
* **Global** – Visible to all users.
* **Private** – Visible only to the user who created it.
* **Authentication Type**: Choose either **Basic** or **OAuth2**.
3. If **Basic** is selected:
* **Username**: Provide the username associated with the credential (e.g., Jira account username).
* **Password/API Token**: Enter the password or API token for authentication with the chosen system.
* **Jira URL**: Provide the Jira instance URL, such as: `https://Saparate.atlassian.net`.
* **Proxy Type**: Select the proxy type for communication .
4. If OAuth2 is selected:
1. **Client ID**: Obtain the Client ID from the **Atlassian Developer Console**.
2. **Client Secret**: Obtain the Client Secret from the **Atlassian Developer Console**
3. **Jira URL**: Provide the Jira instance URL, such as: `https://Saparate.atlassian.net`.
4. **Proxy Type**: Select the proxy type for communication .
5. Click **Save** button to save the credentials.
{% hint style="info" %}
For information on setting up the tokens in JIRA, please refer to the link -
{% endhint %}
### **ServiceNow**
1. Click on the **"Register Credential"** button**.**
2. **Fill in the following fields:**
* **Credential Name**: Enter a name for your reference in ReleaseOwl.
* **Credential Type**: Select **ServiceNow**.
* **Scope** – Select the scope of the credential:
* **Global** – Visible to all users.
* **Private** – Visible only to the user who created it.
* **Authentication Type**: Choose either:
* **OAuth2**: For token-based authentication.
* **Basic Authentication**: For username and password-based access.
* **Instance URL**: Enter your ServiceNow hosting URL.
#### **For OAuth2 Authentication**
1. Log in to your ServiceNow account.
2. Navigate to **ALL** and search for **Application Registry**.
3. Click on **Application Registry**.
4. Locate and click on **ReleaseOwl** in the list of OAuth Registries.
5. View the **Client ID** and **Client Secret** associated with ReleaseOwl.
6. Copy the **Client ID** and **Client Secret** and paste them into the corresponding fields in the **Register Credential** form in ReleaseOwl under **OAuth2 Authentication**.
7. Click the **Save** button.
8. Click **Generate Token**.
9. A popup will appear prompting you to enter your ServiceNow **username** and **password**.
10. Enter your credentials and click the **Generate** button.
11. The generated token will be available in the **Manage Tokens** section under **ALL** in the ServiceNow website.
#### **For Basic Authentication**
1. Log in to your ServiceNow instance.
2. Click the **Request Instance** button.
3. You will receive an email containing the instance details.
4. In the email, locate the section containing your **username** and **password** details.
5. Copy these credentials and paste them into the corresponding fields in the **Register Credential** form in ReleaseOwl under **Basic Authentication**.
### **Ui path**
1. In the **Credential Manager**, click on **Register Credential**.
2. **Fill in the Credential Details**:
1. Enter the following details:
1. **Credential Name**: Enter a name for your credential.
2. **Credential Type**: Select the appropriate credential type.
3. **Scope** – Select the scope of the credential:
* **Global** – Visible to all users.
* **Private** – Visible only to the user who created it.
4. **Token URL**: Enter the following URL: [https://account.uipath.com](https://account.uipath.com/).
3. **Obtain Client ID and Client Secret**:
1. Log in to your **UiPath Orchestrator** account.
2. Click on your **profile icon** (usually in the top-right corner) and select **Preferences.**
3. In **Preferences**, go to the **Privacy & Security** section.
4. Click on **View API Access**.
4. Here, you will find your **User Key**, which acts as both the **Client ID** and **Client Secret**.
5. **Copy and Paste Credentials**:
6\. Copy the **Client ID** and **Client Secret** from the **View API Access** section in UiPath.
```
```
7\. Return to the Register Credential page in ReleaseOwl.
8\. Paste the Client ID and Client Secret into the appropriate fields.
6. Click **Save** to register the credential.
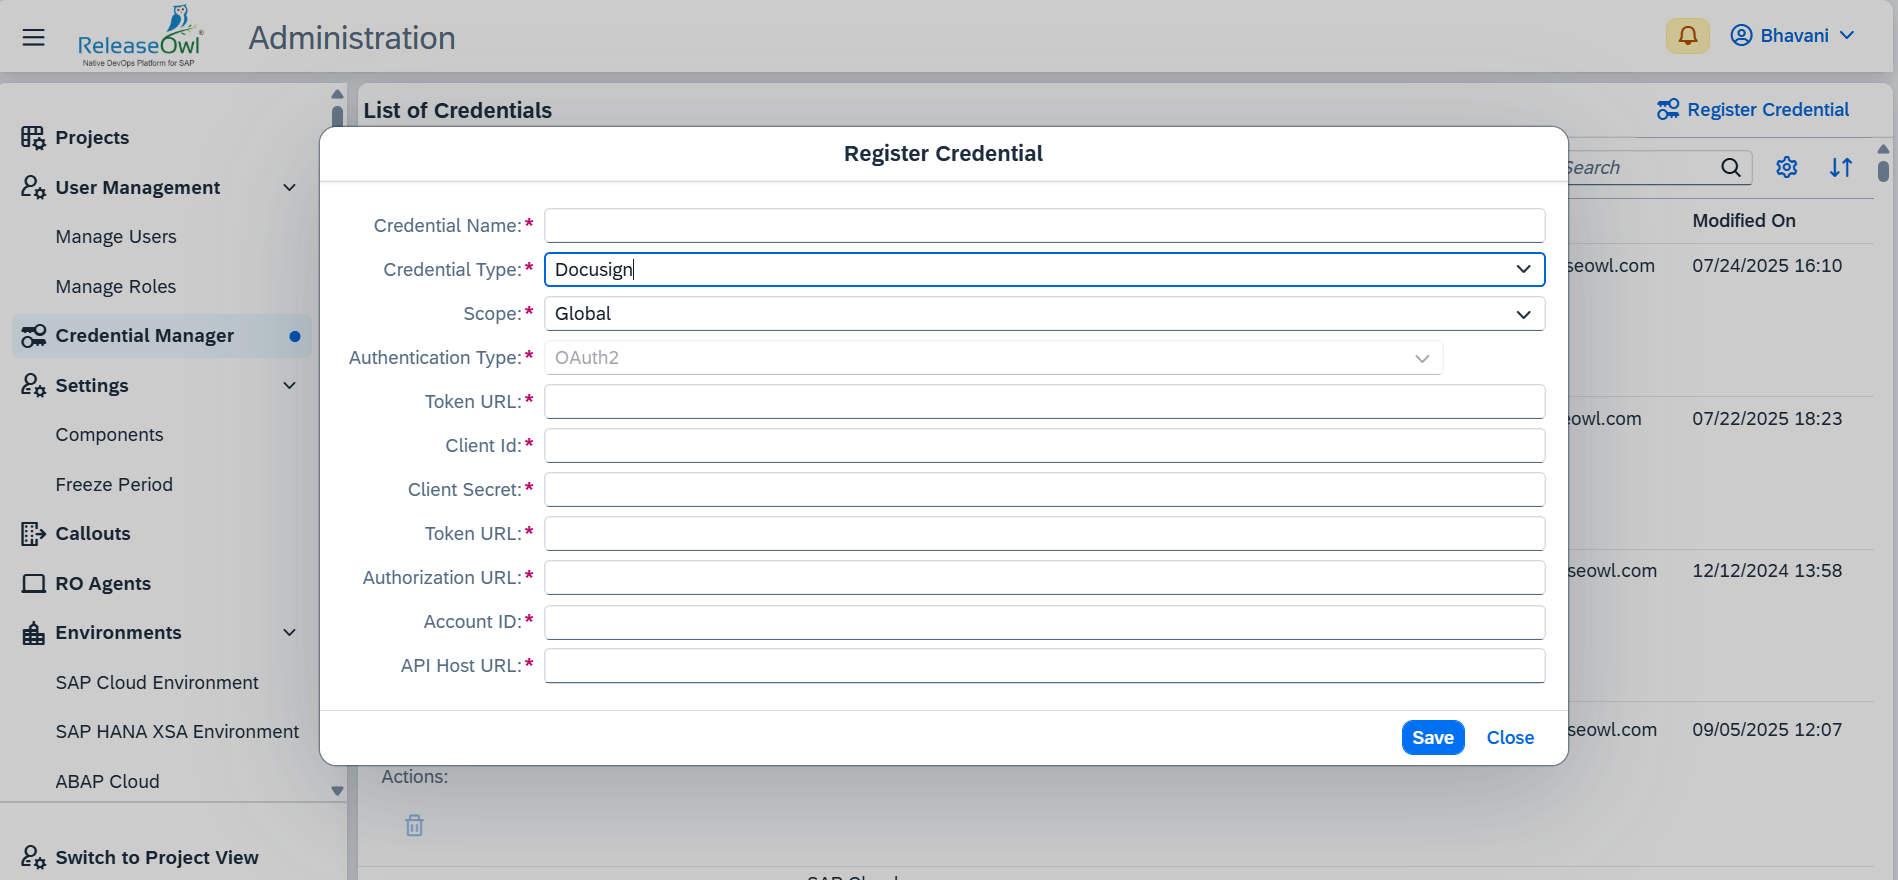
### **Docusign**
1. Click on Credential Manager and then Register Credential.
2. Fill in the fields:
* **Credential Name**: Enter a reference name of your choice.
* **Credential Type**: Choose DocuSign.
* **Scope** – Select the scope of the credential:
* **Global** – Visible to all users.
* **Private** – Visible only to the user who created it.
**Retrieve Client ID and Secret**
3. Log in to DocuSign and click the “**Admin**” button.
4. Navigate to Integrations and select Apps and Keys.
5. Click Add App and Integration Key.
6. Copy the Integration Key which is nothing but the client id
7. Click on the “**Add Secret Key**” button which is nothing but the Client Secret
8. Set the Redirect URI to:
*
9. Check all allowed HTTP methods and click Save.
**Save Credentials in ReleaseOwl**
10. After creating the app successfully, click on the Actions button, then select Edit.
11. In the Apps and Keys section, locate:
* **API Account ID**: This is the Account ID.
* **Account Base URL**: This is the API Host URL.
* Copy these URLs to paste them into the credential manager.
12. Use the following URLs:
* **Token URL**: The DocuSign URL with /oauth/token.
* **Authorization URL**: The DocuSign URL with /oauth/auth.
13. Copy all the credentials, paste them into the Register Credential, and click the Save button.
**Generate a Token**
14. In Credential Manager, select the created credential.
15. Click Generate Token to verify if the entered credentials are correct.
### **CRT**
1. Click on the **"Register Credential"** button.
2. Fill in the required fields:
* **Credential Name**: Enter a name of your choice.
* **Credential Type**: Select **CRT.**
* **Scope** – Select the scope of the credential:
* **Global** – Visible to all users.
* **Private** – Visible only to the user who created it.
* **Username**: Enter your CRT username.
* **Personal Access key :** Provide the required access token ( found in your CRT account).
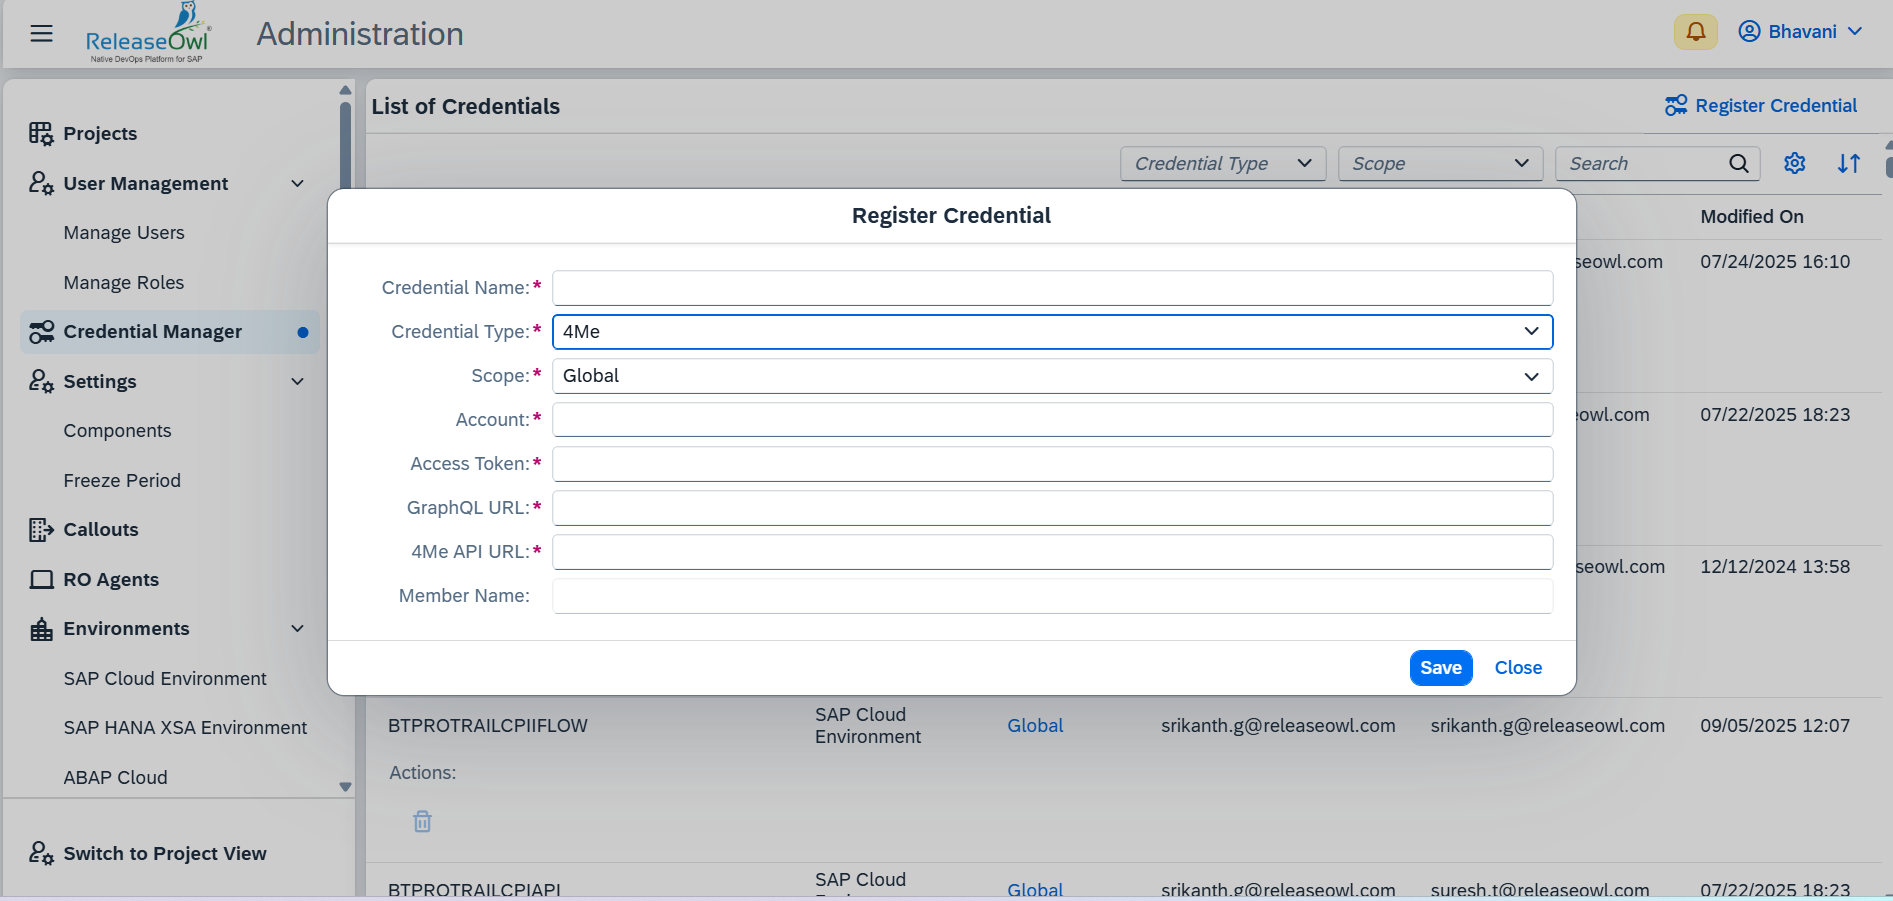
### 4Me
Follow these steps to register your 4Me credentials in the system:
1. Click on the "**Register Credential"** button.
2. Fill in the Required Fields:
| **Field** | **Description** |
| ------------------- | --------------------------------------------------------------------------------------------------------------------------------------------------------------------------------------- |
| **Credential Name** | Enter a name of your choice. |
| **Credential Type** | Select **4Me** from the list. |
| **Account** | Enter **WDC**. |
| **Access Token** | Provide the required access token (found in your 4Me account). |
| **GraphQL URL** | Enter: `https://graphql.4me.demo.com` |
| **4Me API URL** | Enter: `https://api.4me-demo.com` |
| **Scope** |
Select the scope of the credential:
Global – Visible to all users.
Private – Visible only to the user who created it.
|
### Freshservice
#### **1. Open the Credential Registration Page**
* Click on the **"Register Credential"** button.
**2. Fill in the Required Fields**
| **Field** | **Description** |
| ----------------------- | ---------------------------------------------------------------------------------------------------------------------------------------------------------------------------------------------- |
| **Credential Name** | Enter a name of your choice. |
| **Credential Type** | Select **Freshservice** from the list. |
| **Authentication Type** | Select **Basic** authentication. |
| **API Key** | Enter your Freshservice API key. |
| **Password** | Enter the associated password. |
| **Instance URL** | Enter your Freshservice instance URL (e.g., https\://\). |
| **Scope** |
Select the scope of the credential:
Global – Visible to all users.
Private – Visible only to the user who created it.
|
### **Others**
1. Click on the **"Register Credential"** button.
2. **Fill in the required fields:**
* **Credential Type**: Select **Others** for any basic authentication not covered by the available options.
* **Scope** – Select the scope of the credential:
* **Global** – Visible to all users.
* **Private** – Visible only to the user who created it.
* **Credential Name**: Provide any name of your choice (e.g., "Custom Access").
* **Username**: Enter your username for the required account.
* **Password**: Enter the password associated with your username.
3. Click **Save** to finalize the setup and enable access to your required account.
**Edit**
* You can edit a credential by clicking on the registered credential entry. This allows you to make and save any necessary changes.
* Additionally, you can view information about who created and last modified the credential.
**Delete**
* You can delete any credential by clicking the delete icon seen against that credential.
{% hint style="info" %}
**Note: Edit** and **Delete** options are available only for the users with appropriate user roles.
{% endhint %}